It's almost Easter and that means Easter cookies! I thought I'd do a quick tutorial on some very easy carrot bundles. I started out planning to do this a bit differently than they turned out. The tops of carrot stalks are sort of hard to imitate, they're not quite fuzzy but have so many parts to the leaves that you really can't do them individually. I sketched these cookies out planning to use stiff icing to make the tops using squiggly lines, but once I started doing that it really looked awful! So, I grabbed my trusty paint brush and went to work. But I'm getting ahead of myself, let's start at the very beginning ( *sing with me!* it's a very good place to start...).
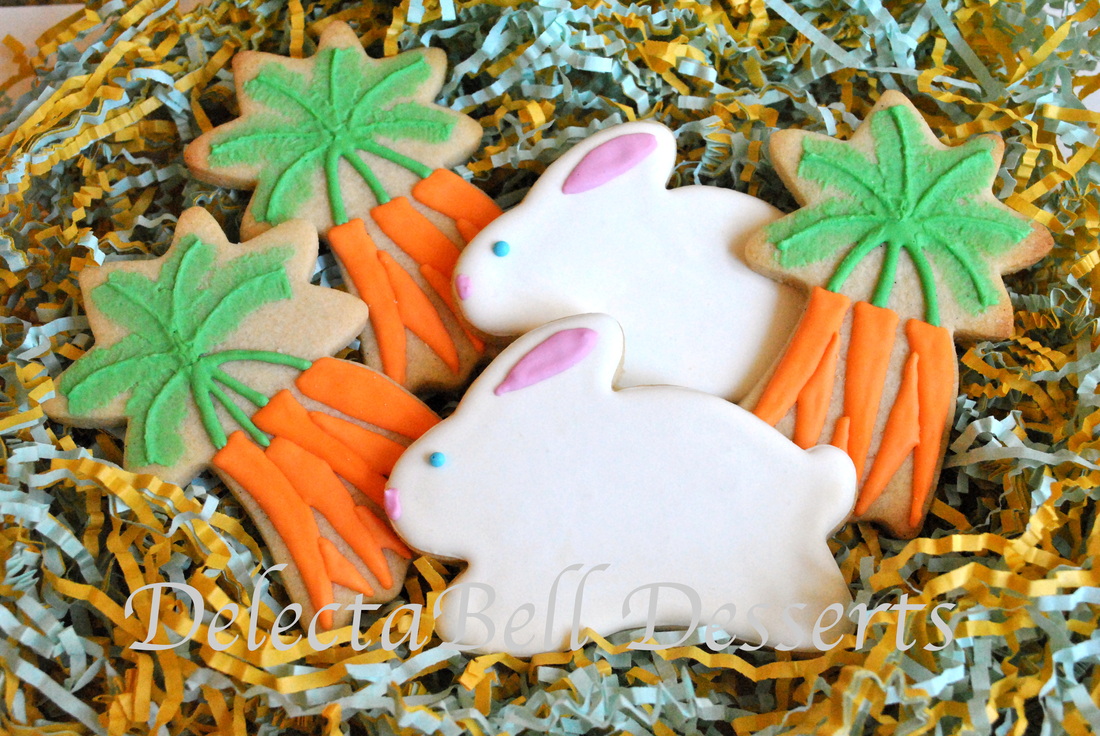
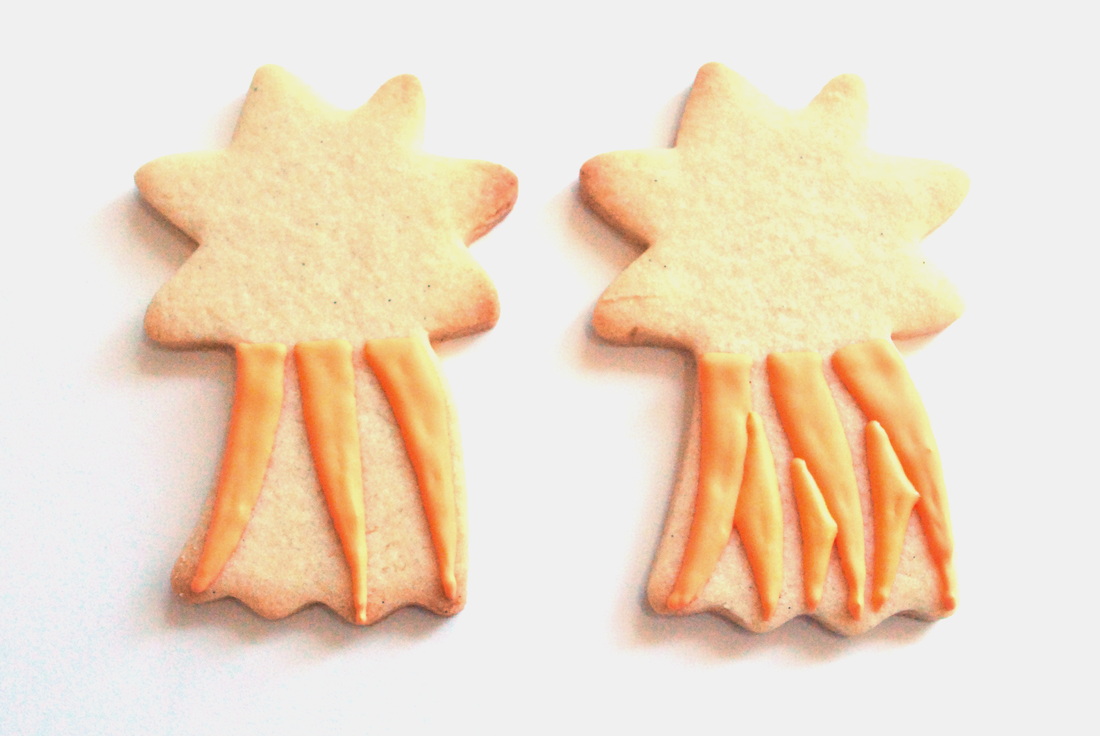
This year I wasn't keen on doing individual carrots, they just didn't excite me but I loved the idea of a bunch of carrots, only problem was that I didn't have a cutter for that. So, after sorting through my boxes I settled on this shooting star, pointed bottom for carrots and the star part for the leaves. What you'll need:
1-baked cookies, use the shooting star or whatever else you think might work
2-orange and green 20 second icing (you can use whatever tip you like, I used PME 1.5 tips)
3-paint brush
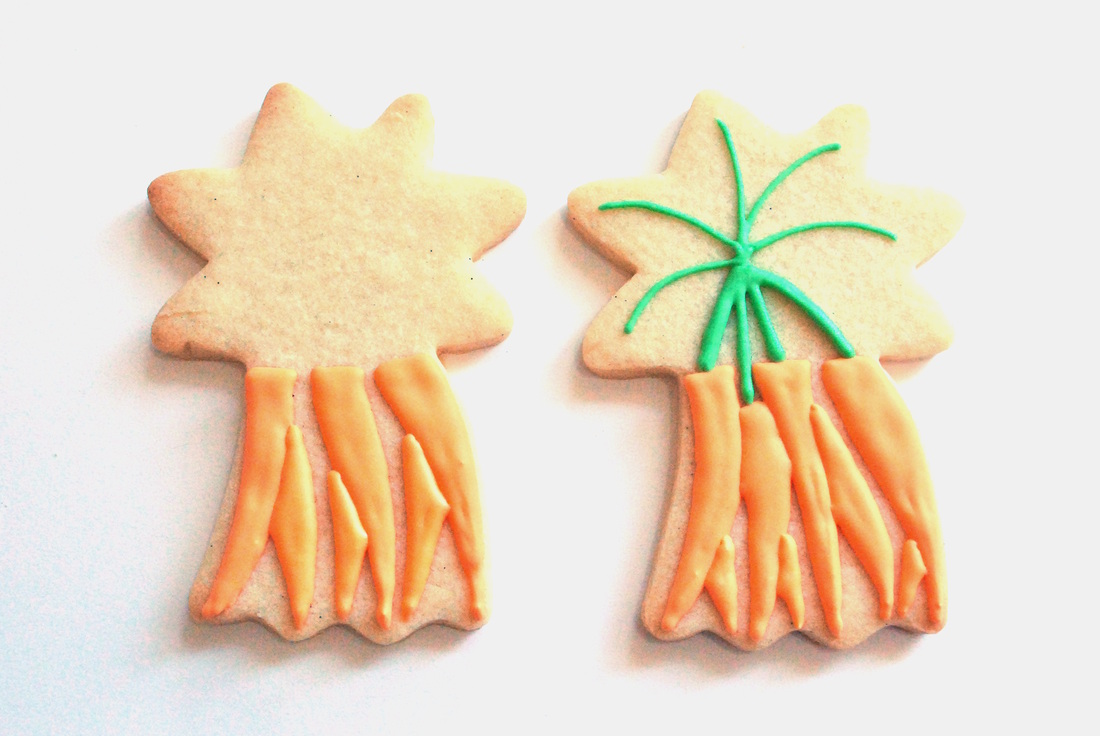
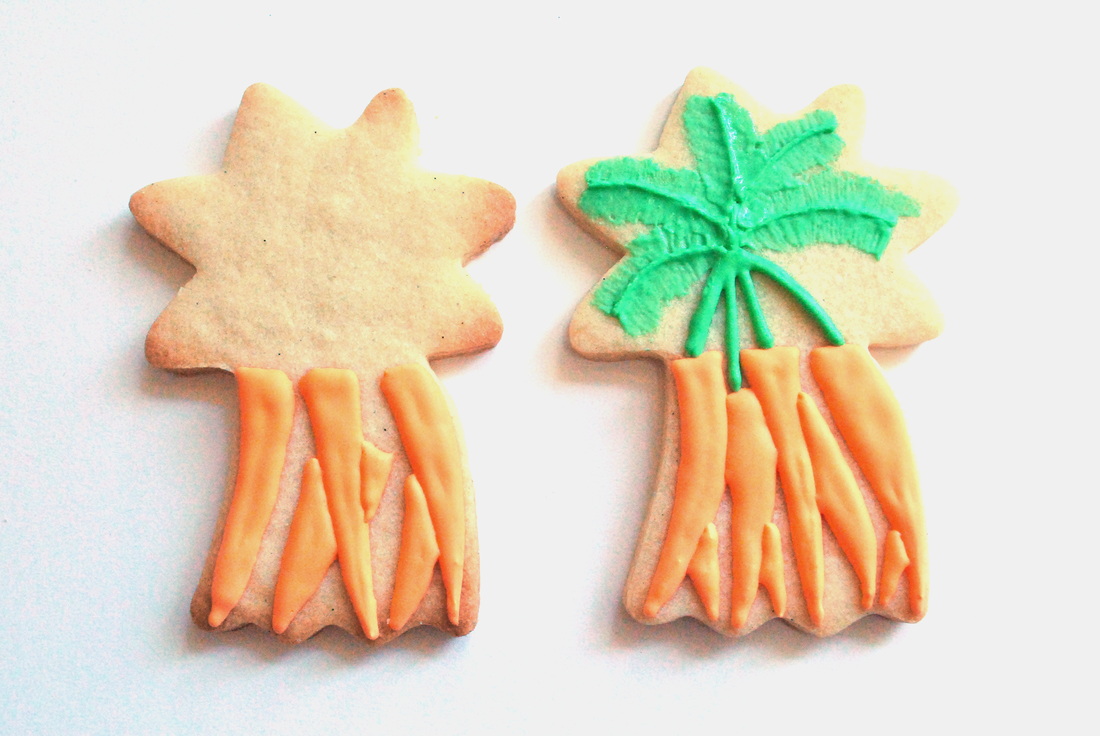
To start, simply pipe a few carrots onto the bottom part of the cookie with your orange 20 sec icing. Easy-peasy. They don't need to be perfect, have you seen real carrots from the garden? They're all different and potentially funky looking. We grew carrots that looked like toes ones year, they boys LOVED them! Let those sit for a bit, I can't remember how long I let them dry, long enough to be Capt. Hook and chase my little Peter Pans around the yard for a while. Then go back and add some more carrots to look like they are underneath the first ones. Next, grab your green icing and draw some stems coming up from the carrots, make them meet somewhere in the middle of the star part of the cookie. Then draw some lines going out from there to the points. For the next step you'll need your paintbrush handy. Pipe a green line on either side of your green lines that go towards the points, does that make sense? Then take your dry brush (I used a pretty big one) and pull/brush the icing outward. Again, this does not have to be perfect, you sort of want a highly textured and messy look to it. Do one part at a time, you don't want the icing to dry before you have a chance to brush it.
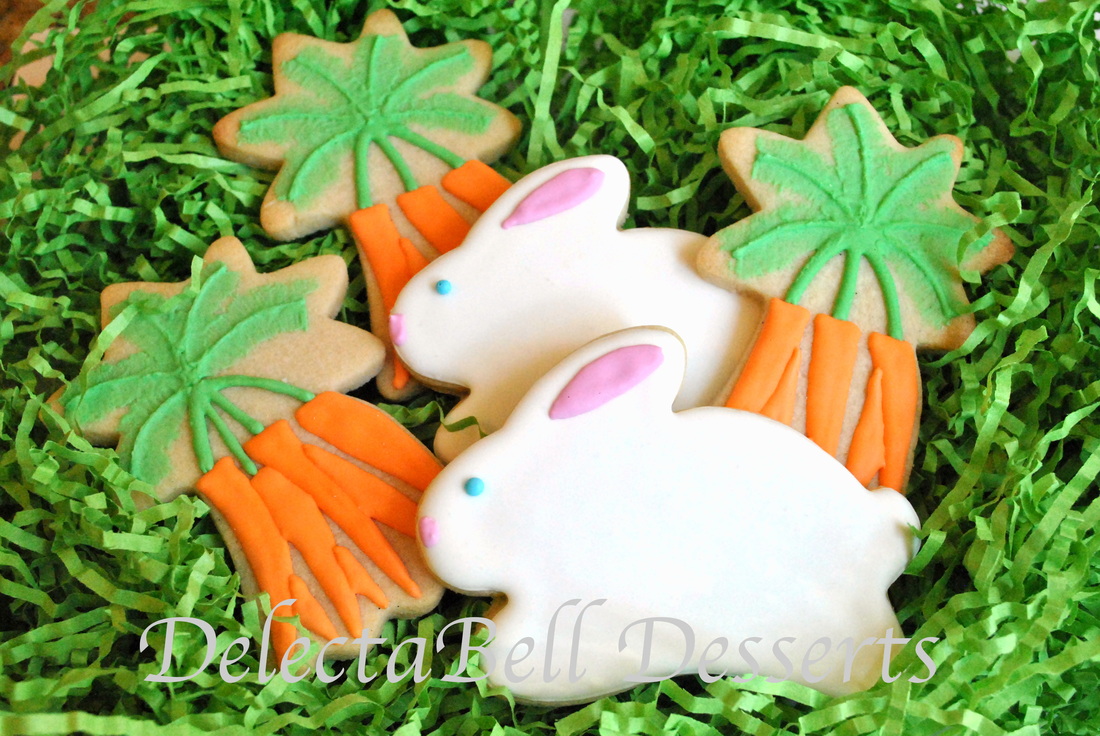
And with that, you have some super easy, super cute carrot bunches. Pair them with some hungry bunnies and they're perfect for anyone's Easter basket!(I have to add that I am using these for my submission to Lila Loa's March challenge. To change up my photography on this set I did a little playing around with pre-setting my white balance. I've never done that before, I usually just go with auto and edit on the computer. This time I actually used a white card and set that as the white balance in the camera. I also used the Easter grass instead of a plain, flat background. I'm pretty pleased!)
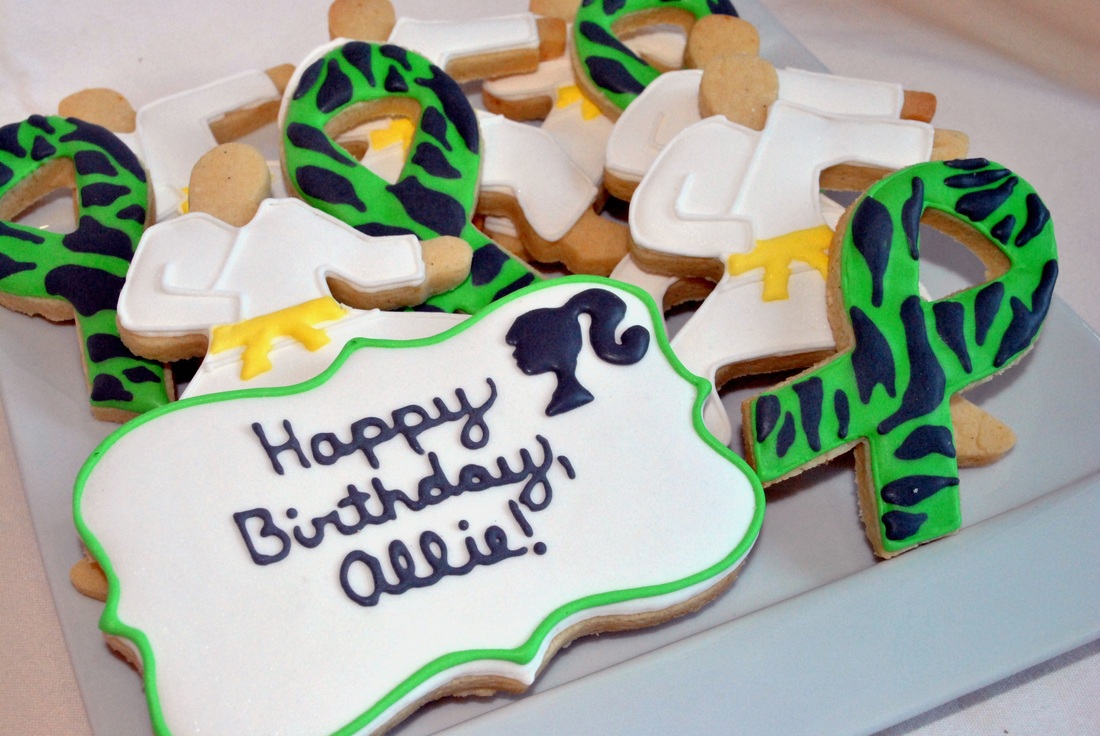
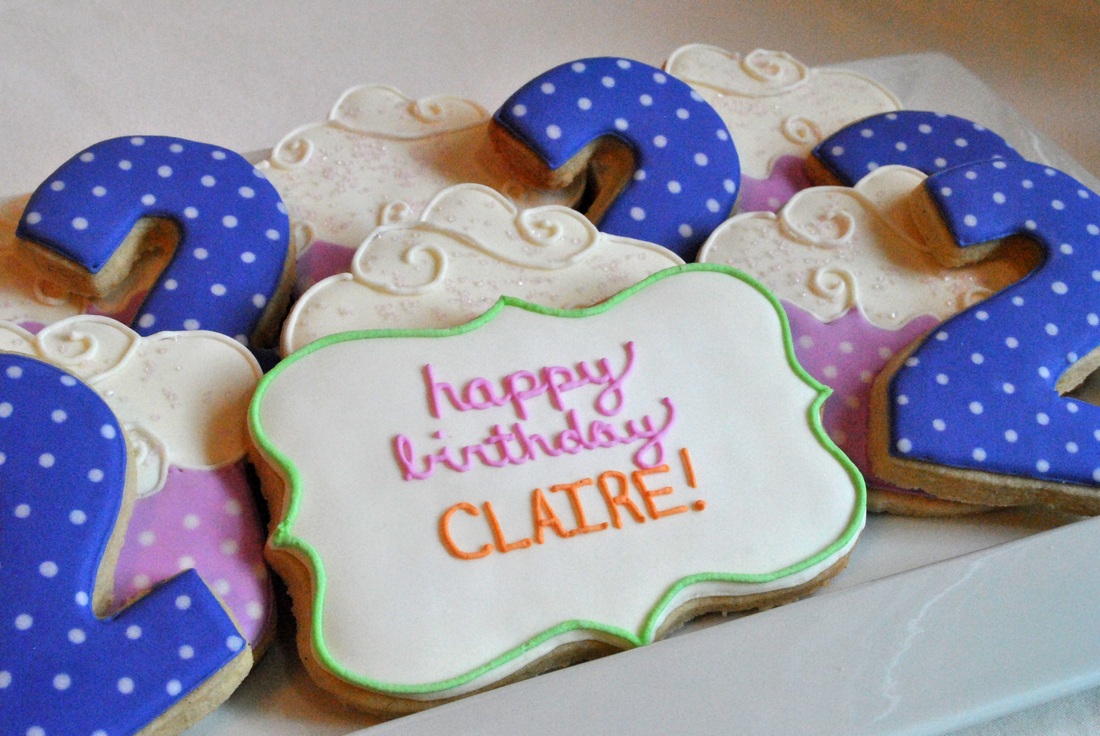
This week I want to talk about writing on cookies, it can be a little intimidating but with a little patience and practice it produces really nice results. Hopefully, I can give you a few tips and tricks to try. We'll start out with something easy and the move on to something a bit more complicated.My first tip for writing with royal icing is to make sure you are using thick icing. It needs to be able to almost hold up a spatula if you stick one into it or have a peak that the point sort of curls over when you scoop it up. You do not want your icing spreading out as you are writing (it makes it look messy and the letters will start to ooze together) so it needs to be thick, BUT you don't want it so thick that you can't get it through your small tip. Which brings me to my second tip...what tip to use. Let me just say that I have a lot of Wilton tips, and they are good for a lot of things. But for writing, especially small writing, nothing beats a PME tip. I love my PME 0 tip, it is usually my go-to tip for writing. They are pricey but, in my opinion, worth it (you can find them at Karen's Cookies).Ok, so you have your icing and a small tip, now you need to practice. Don't try to change how you write, it needs to feel natural or you will never be happy with the results and hate doing it. I'm not saying you should do chicken-scratch writing, try to keep it neat, but let it be in your own hand. Get a piece of wax paper or parchment paper and just practice, writing your name is a good start, you've done it enough to have some confidence :) Try both print and cursive writing, they feel very different when using a piping bag and you'll find you need to adjust your technique.Unlike outlining, when you are writing, you will want to keep your tip close to the cookie. Some people feel more comfortable 'pushing' the icing and some people prefer 'pulling', either way is just fine. I'm a puller, myself.
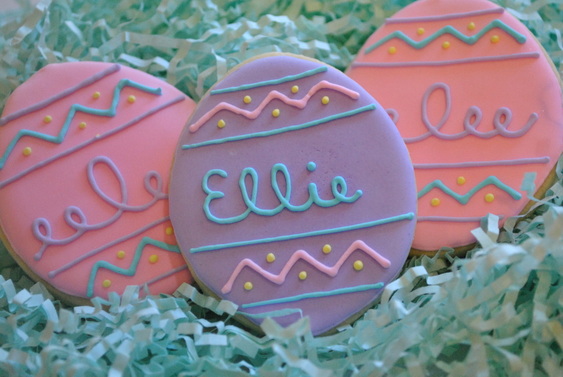
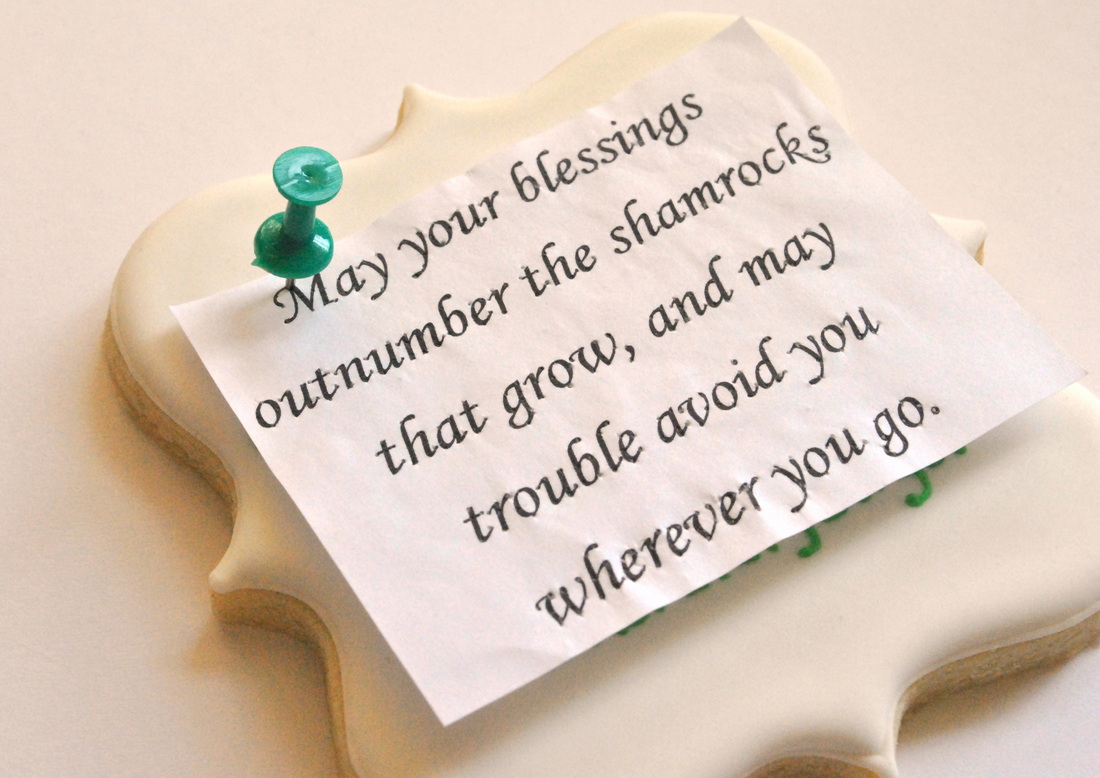
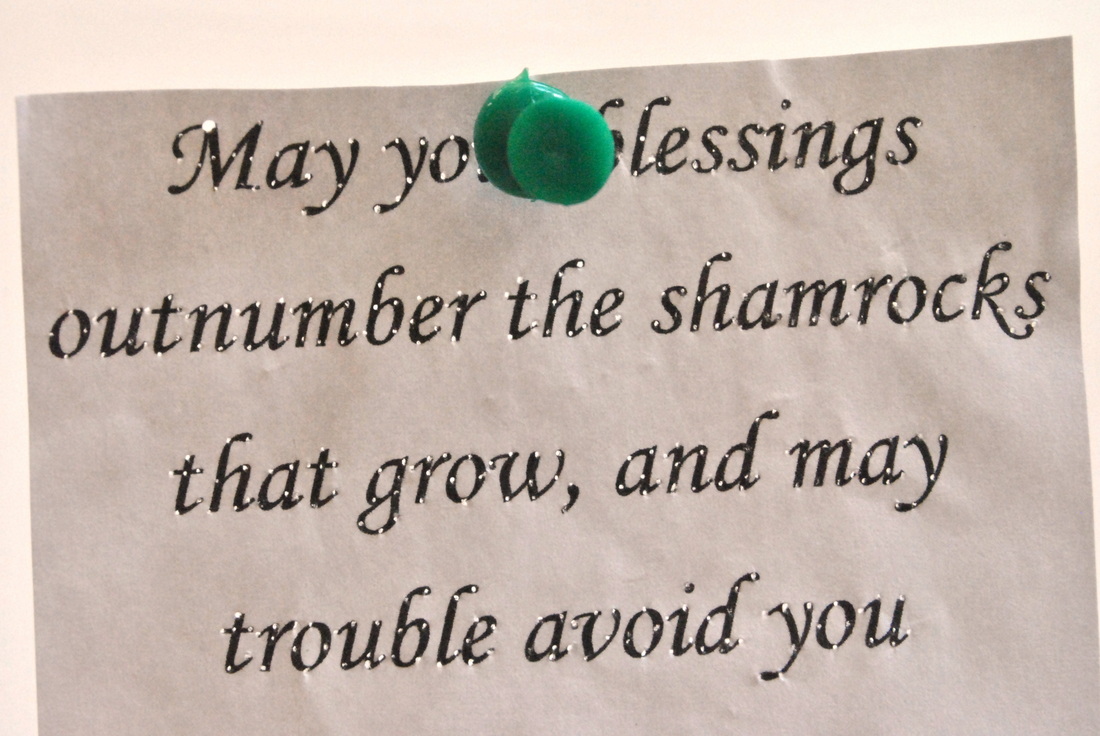
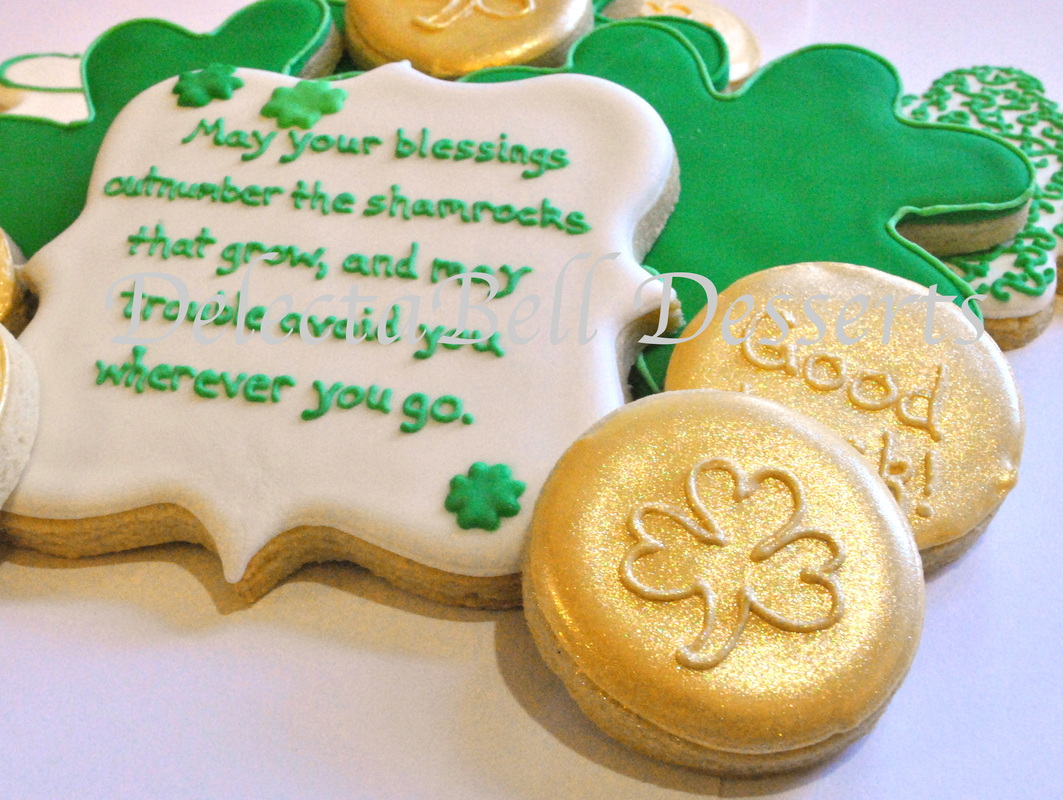
A good first cookie project is to make personalized cookies, just writing one name on each cookie will give you a feel for spacing, letter size, etc. When you are doing the same name on the same cookie, have a few extras to practice on before doing the 'real' ones, you'll be amazed at how much it will help you get going. Once you get some practice and feel confident you can move on to something more complicated. For the Irish blessing on this cookie I started out by typing the blessing in a document editing program with the margins set to the size of the cookie. You can make it so that the text is centered instead of left justified so you can see how you should space it out. Print it out and make sure it will fit on the cookie. You might be wondering why I jammed a push pin into a perfectly good cookie. Good question! I know other cookiers use push-pins to help them mark out a design, and this is the same concept. The first time I did a quote cookie I pretty much made holes to outline every letter and let that guide me. While effective, it takes forever to poke all those holes!! Now that I have more experience, my preferred method is to mark the top and bottom of the first letter to get my letter height right and to provide me with the correct starting point. I also make a small mark where the last letter should end, just to keep me in line and let me know how much space I have left. An important note about using this push-pin method: you should pre-poke your holes in your paper! I did not do that one time and because you have to use some force to get through the paper and icing you might end up pushing too hard and making a crater in your icing!! You can see below how many hole you would have to poke to if you are going to do every letter...now you know why I now do only the first and last as guides. Besides that, once you take the paper away and all that is left are a zillion holes and it is an eye-crossing, daunting task to make them into letters. Again, this is one of those things that you really have to practice. Not only your writing and piping technique but also your icing consistency. I think it is a great still to have in your arsenal and it will improve all of your piping skills. Hope you give it a try, I'd love to see how other people's cookies turn out!
For some reason when I hear the word 'shimmer' I start singing the "Chin Up" song from Charlotte's Web, "Twinkle, sparkle, let a little sunlight in!". With two little kids, it seems like most of my thoughts end up back at random kid's songs. But since I also make cookies, my mind eventually circles back to that...and it makes me smile to make my cookies twinkle and shimmer a little. It's a great way to add some extra visual interest to a cookie platter or to make individual cookies a little more special.
There are a few things you'll need to make your cookies shimmer:
1- a decorated cookie (I use royal icing) that has completely dried, as in overnight.
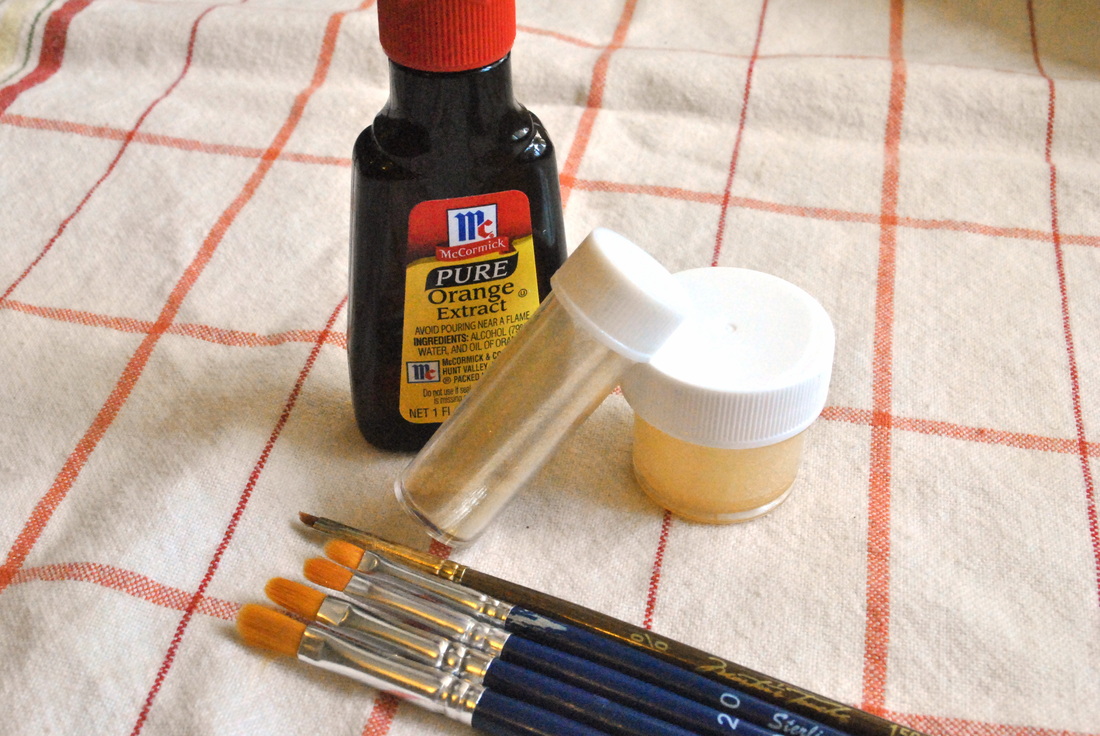
2- an extract. I like to use orange, or an alcohol like vodka (much cheaper than orange extract). You need to use an alcohol, not water, because it will evaporate quickly and not soak into your cookie.
3- paint brush. Buy a NEW one from the store, not one that you've been using to oil paint! Get a few different sizes as you never know what size area you might be covering.
4- pearl dust (tube shaped container in the below picture). I use the Wilton brand, mostly because I can get it 40% off at Hobby Lobby :) and it comes in a range of colors
5- small vessel in which to mix your paint. The one below used to have Wilton powdered color in it, but it was an awful color so I dumped it out and use it for mixing and storing my shimmer paint (I have a vessel for each different pearl dust color I use). I like that I can seal it up (remember, alcohol evaporates pretty quickly) when I need to stop what I'm doing for a minute.
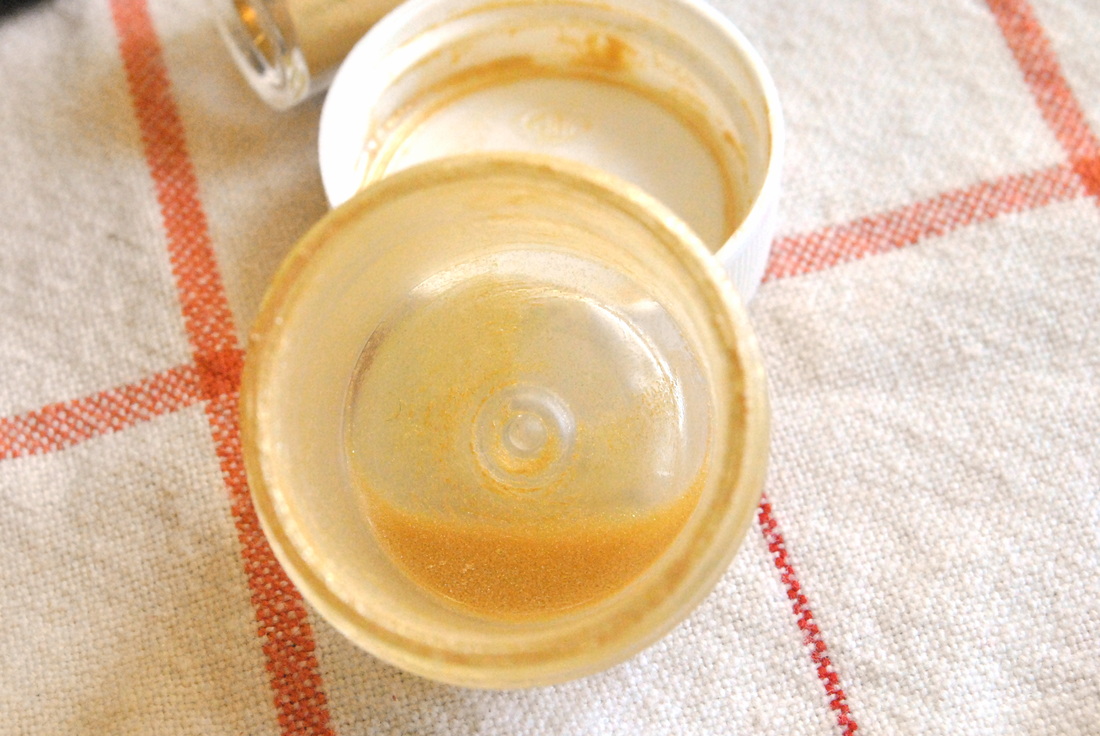
From here on out it's really pretty simple, mix your pearl dust with a little bit of extract or vodka to make a 'paint'. You want it thin enough that it is not clumpy but thick enough that it doesn't run all over the place. As is true for a lot of things in cookie decorating, you'll just have to get the feel of it for yourself.
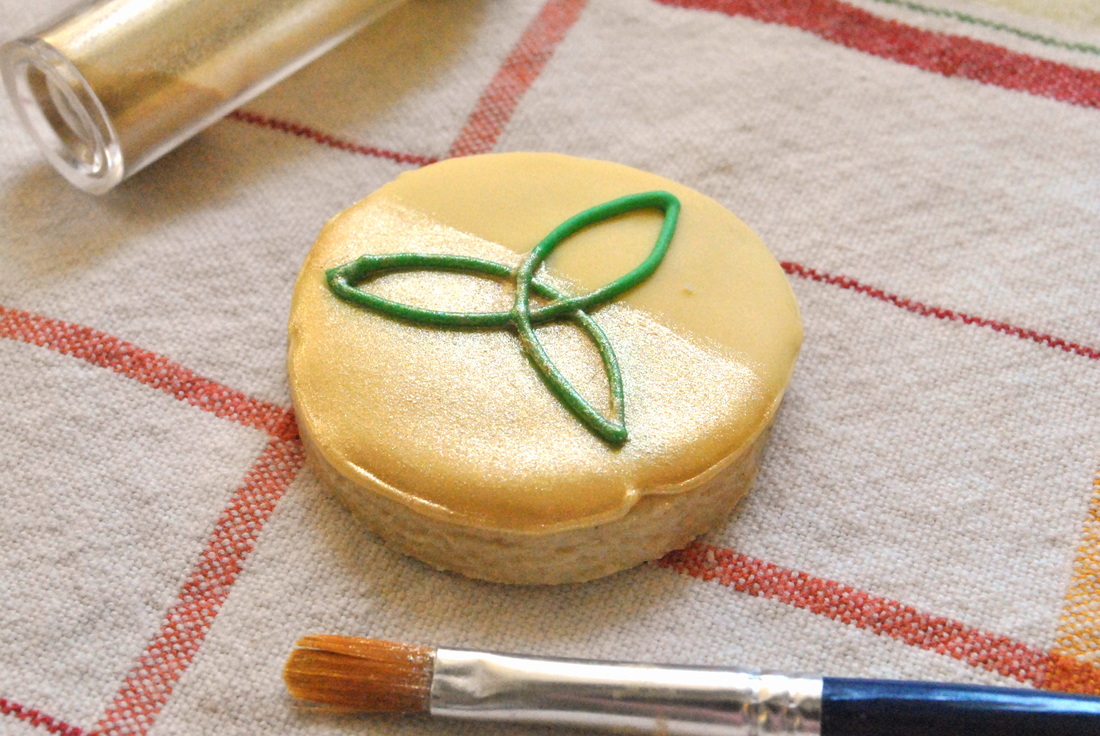
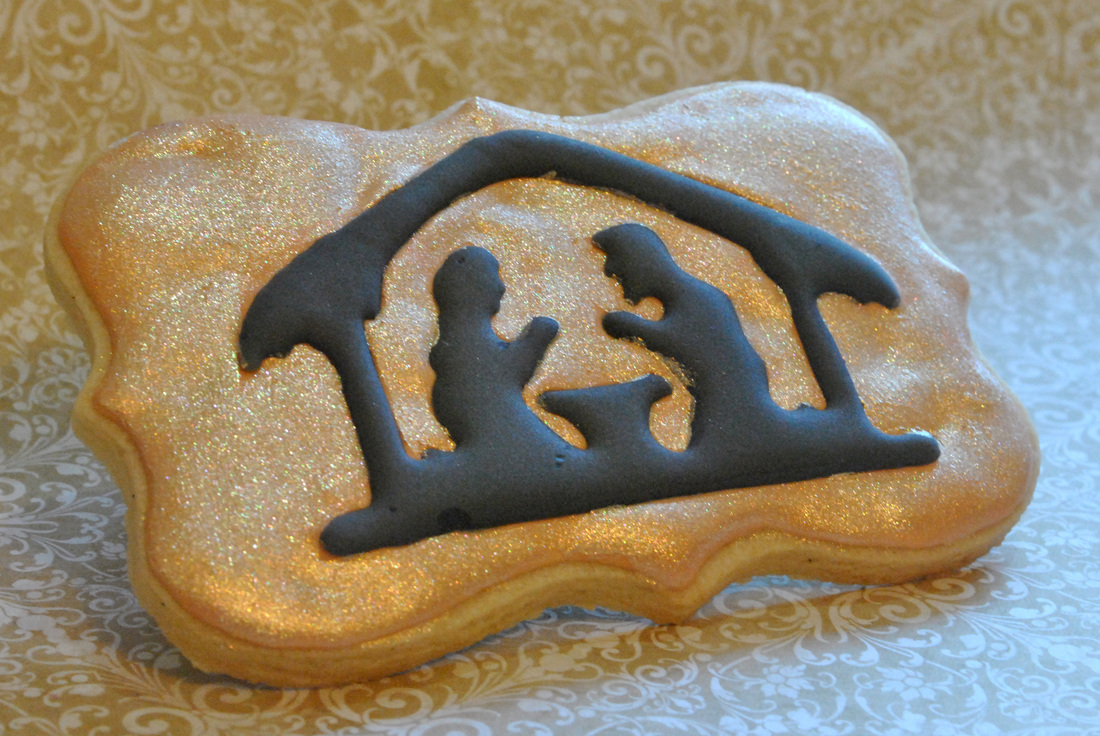
Here you can see some of it that I have mixed up, not sure if this is helpful at all, but you can see that it doesn't clump up but does run down to the bottom of my vessel. If you are adding shimmer to a lot of cookies, you may find that your paint begins to thicken, this is just due to the alcohol evaporating. Just add a few drops of extract/vodka, mix it up and you're good to go again. You have almost endless options when adding shimmer to your cookies. One options is to paint it over the smaller details like I did with the detail on these Christmas ornaments. This can be a bit time consuming and you will need a very small brush for some of it, but details like this take your cookie from nice to gorgeous! Or you can paint the entire cookie. For this you will need a larger paint brush to 1-speed up the process and 2-avoid seeing any brush strokes. You can see the difference it makes below where only half the cookie is painted. The yellow color icing is none too exciting itself but adding the pearl dust really dresses it up.
I should add here, for this sort of cookie the icing color you paint over should be similar to the pearl dust color you are planning to use. So, if you are doing silver dust, use a gray-ish icing color, for gold use a yellow-brown color, etc. So, you can see that just a little bit of shimmer can go a long way in spicing up your cookies. Get to your craft store and grab a few paint brushes, I promise once you try it you'll be looking to add shimmer and sparkle to all of your cookies!
This is a topic that used to scare me. The first few times that I tired royal icing transfers, I failed. Miserably. It was frustrating and I felt defeated. So, I researched and tried again and again. As usual, all my sweet friends over at Cookiers R Us has the answer: page protectors!
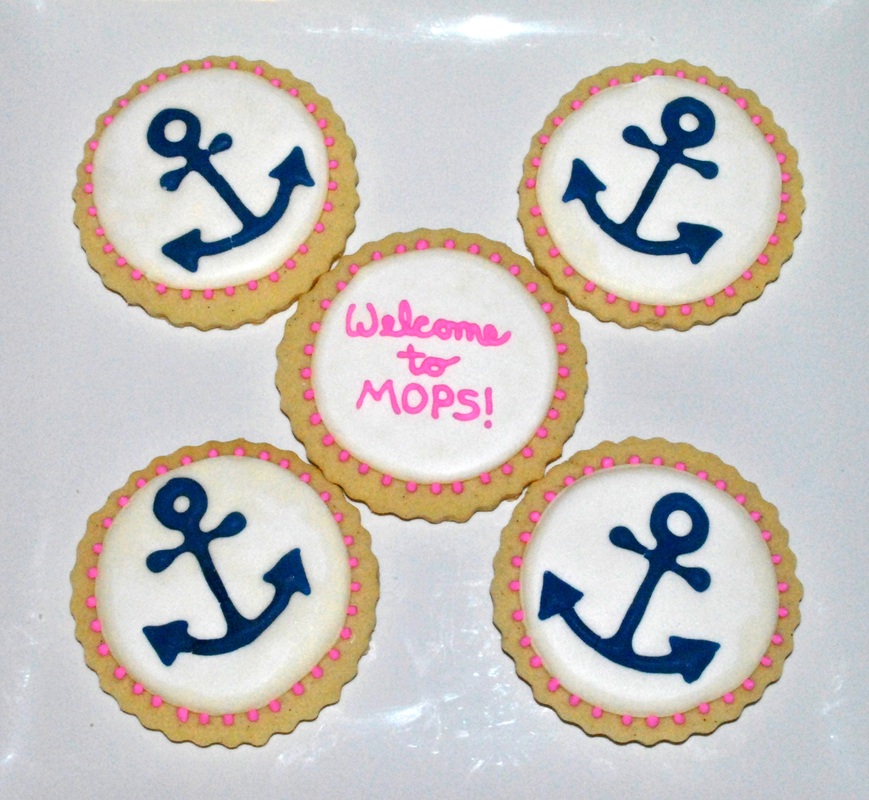
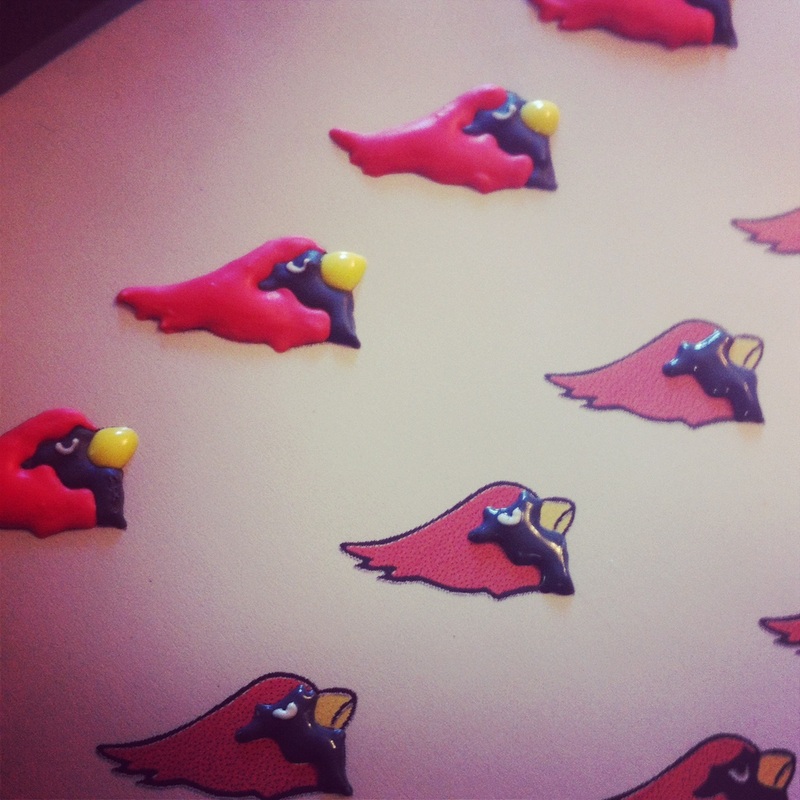
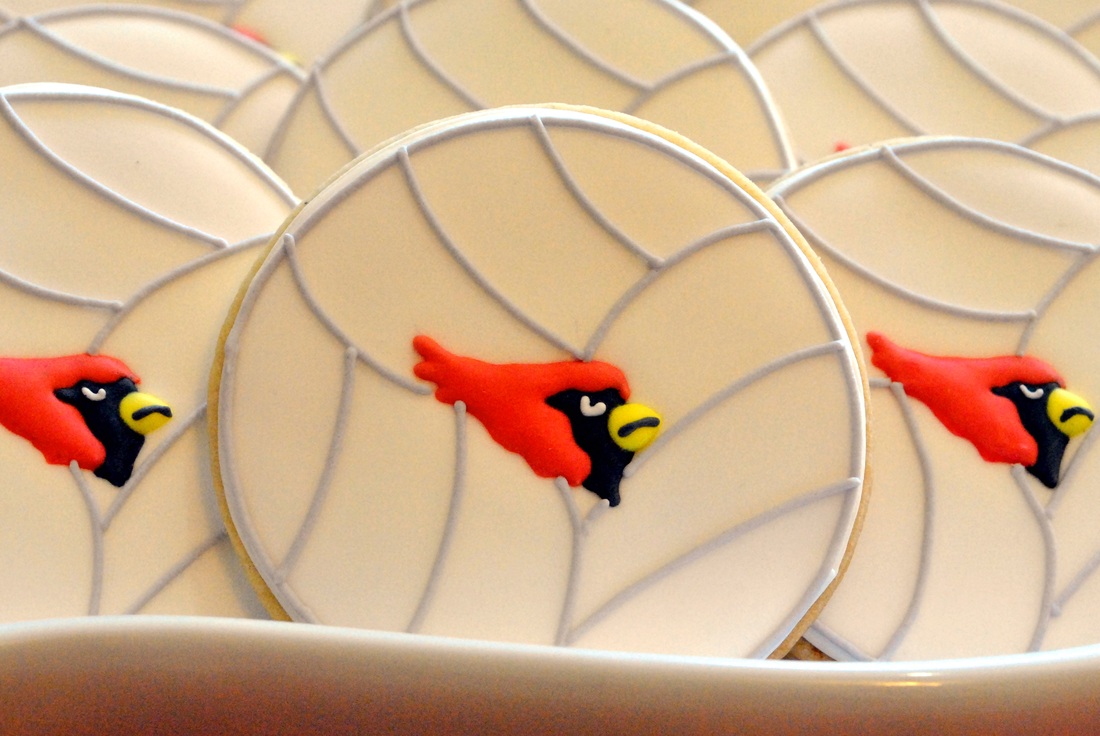
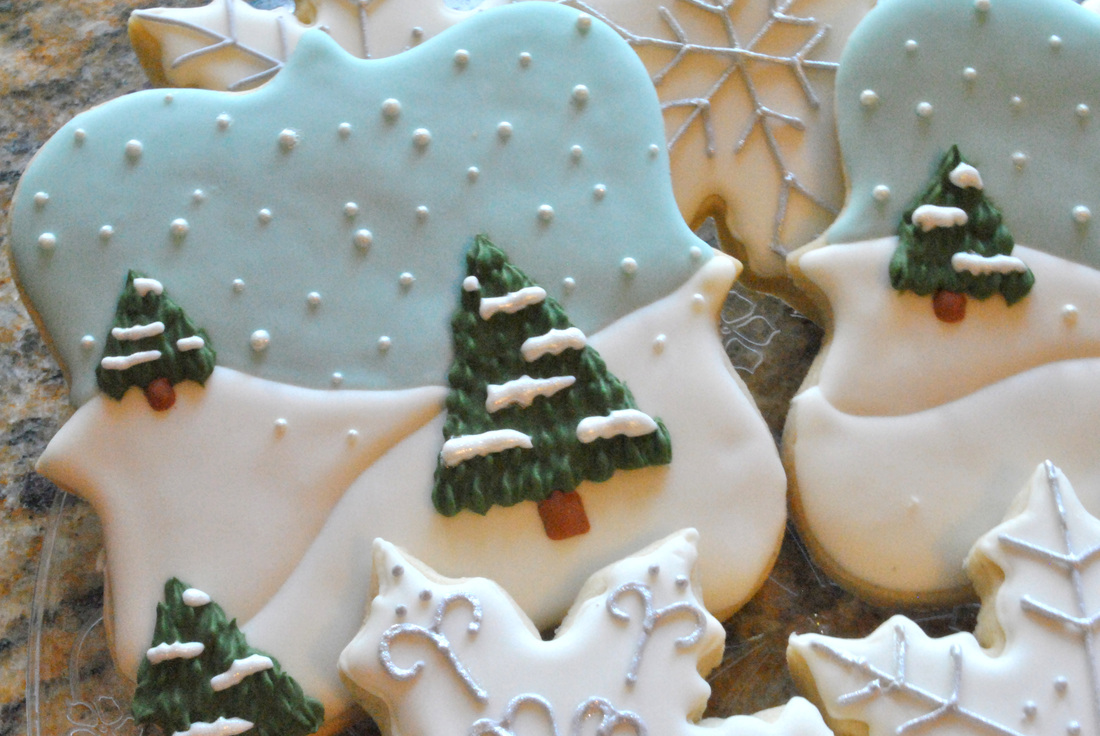
The anchor cookies are one of the first royal icing transfers I tried. Sit back and I'll tell you the saga that ensued... The night before I was going to decorate the cookies I printed out my anchor designs, put wax paper over the paper on a cookie sheet and piped away. I was sssoooo smart and put them in the oven to keep them 'safe' from dust, knocking off the counter etc. The next day I preheated my oven to do some non-cookie cooking... and a little while later I smelled burning plastic. Yep. The wax paper was melting onto my cookie sheets and the transfers burned to a crisp and were ruined. I had to quickly make new ones and only had about 6 hours to let them dry. Y'all, that's NOT long enough! They ALL broke and I had to piece them together. Very frustrating. Needless to say, there were a lot of very valuable lessons learned that day. Let's talk now about what you should do:1-make your design the size you need (you can do this is in a number of computer programs, whatever works for you) and then print it out2-slide your paper into a clean page protector and put this on a cookie sheet or other flat, easily moved surface (bonus for using the page protectors, you can slide that puppy right into your Cookie Book when you're done, never know when you might need that design again!)3-pipe over your design, I like to use 15 second icing, thinner than that and you will get more breakage4-let them dry at least overnight5-very slowly and carefully peel the page protector away from the transfer. If you've let them dry long enough they should pop right off with no problems! Just go slow, start at one edge and work your way across the page and don't worry if one or two break, it is inevitable. (Everyone has a slightly different technique for doing this, and I'm going to be annoying and say that you'll find what works best for you and what 'feels' right.) Below you can see an example of some cardinals I have done a few times. I usually fill in the black for about 8-10 of them and then go back and do the white on the eye, there is less bleeding if you wait just a minute or two. After waiting 10-15 minutes (again to avoid bleeding, black can be a bit tricky that way) go back through and add the red feathers and yellow beak. After you've let them dry overnight, it's time to put them on your cookie. Flood your cookie and wait a few minutes before dropping on the transfer, this will reduce the change of bleeding. This a much bigger concern when doing cookies where are dropping a dark color transfer onto a white background. Because I am super paranoid after making past mistakes, I will usually put them under a fan to help speed up the drying time, so far this has prevented any bleeding issues.
Once you place them on the cookie, you do have a little bit of time in which you can nudge them around a bit to get the positioning correct. You can't move it too much, but a little touch here and there can help you center and straighten them. One last tip for you: make more than you need. There will be breakage, it is unavoidable, especially with smaller, more intricate designs. There is nothing more frustrating that having to piece together transfers or having that last one break on you and not having any extras! If you do have extras, put them in a sealed container and save them for future use! Also, don't turn on your oven if you're using it for 'storage' purposes...it ends badly :)
As always, it's your turn! What are you tricks or tips to getting your royal icing transfers to work?
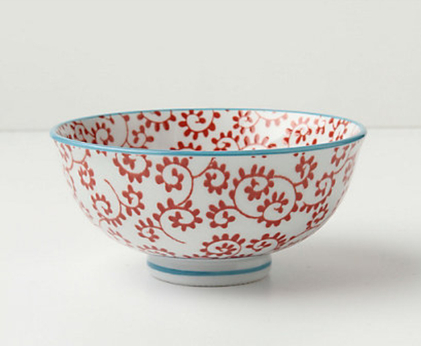
Cookie inspiration. There are some amazingly, incredible, over the top talented cookie artists out there. I use the word artist very purposefully. These people are able to transform a sweet treat into something gorgeous and truly artistic. A lot of people can create wonderful designs solely on their own. I, however, usually need a little help.There are a few places that I go when I'm stuck. I find myself spending more and more time looking at greeting cards now, with little intention of buying them. There are a lot of cards with very cute designs that I can use to spark my imagination. I also go to the Tiny Prints website, frankly, it's a lot easier for me to look at cards on my couch than with the two kids in tow at the store! This Christmas I also found myself wandering the rows of Christmas ornaments at Hobby Lobby looking for fun designs. Once you start looking for inspiration, you'll be amazed where you can find it! This month, Lila Loa posted a new cookie challenge that I've decided to enter. The challenge is to sketch your cookies before you make them. As you remember from my Cookie Book post, I've definitely got that covered! For this challenge I decided to peruse the Anthropologie website to see if anything there inspired me. For this particular challenge, I decided to base my designs on this bowl. I liked the color combination but wanted to make the blue a little more turquoise and the red a little more orange. To make it a little more of a challenge I limited myself to those colors and
white for backgrounds. (I'll admit though, in some ways limiting the colors makes it easier, any one who has made cookies with 6 colors of icing knows it can be a lot of work!)
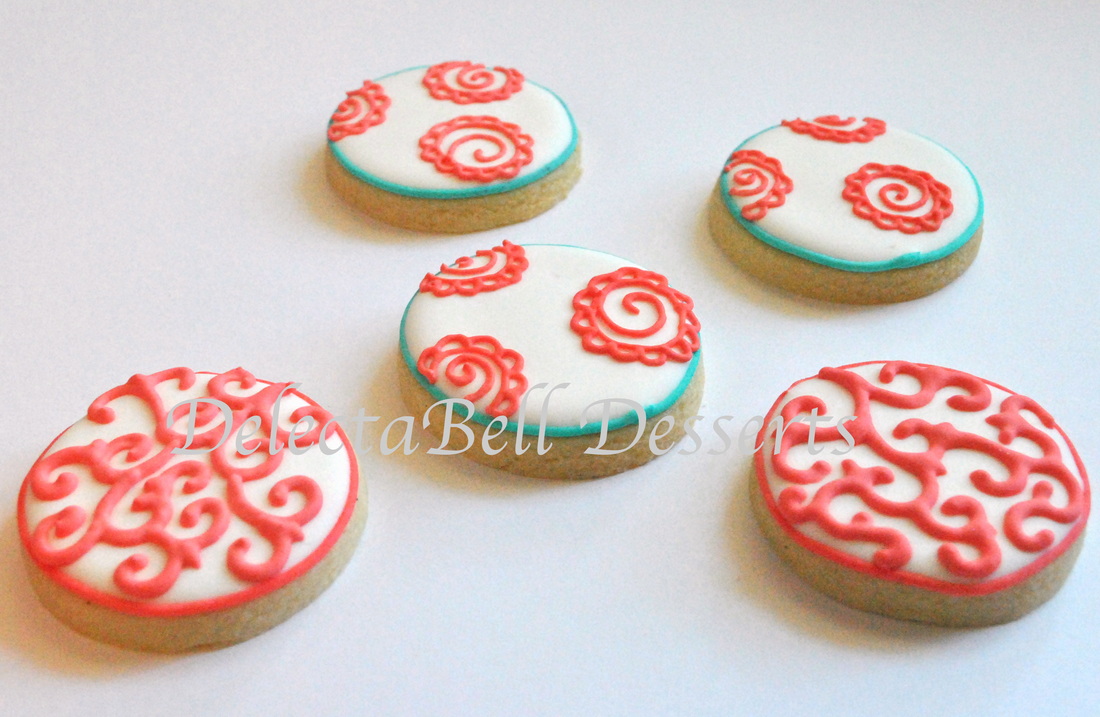
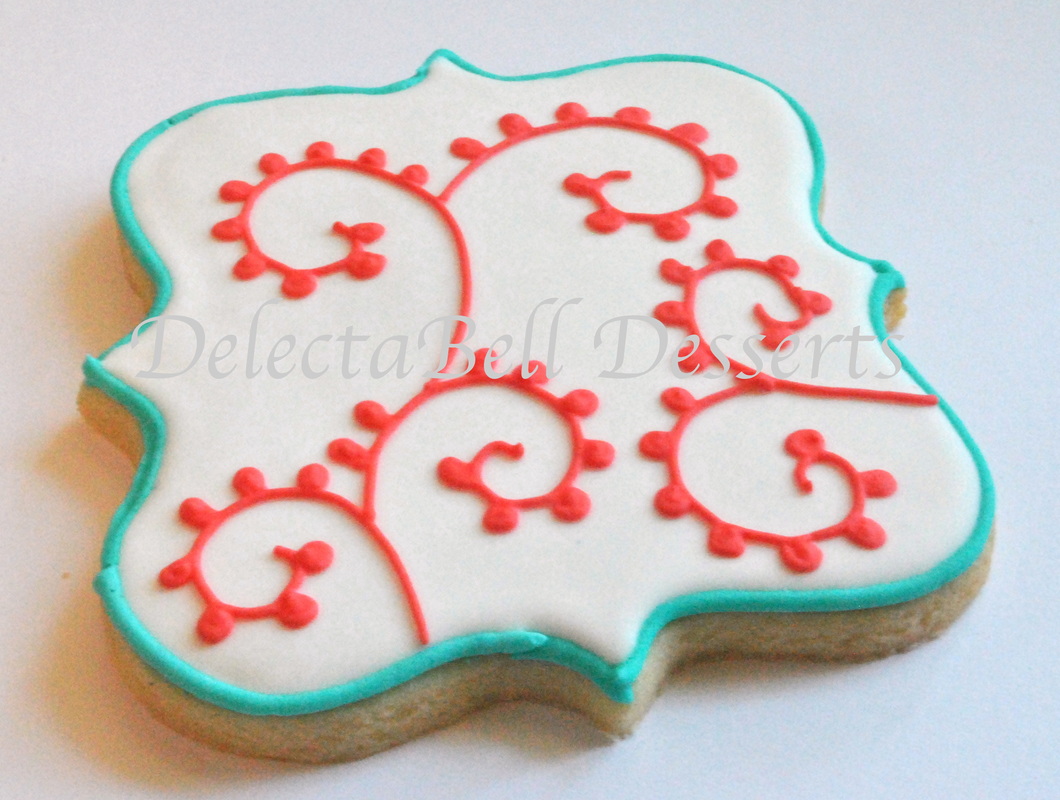
It was fun to do something a little different and more abstract that I usually do. Hope you enjoy them!  Anthropologie inspired cookies Couldn't decide if I liked the rectangle or square center cookie better, so I just posted them both! The cookies on the ends with the pattern in the opposite colors were a design I randomly saw on google images that I can't find again for the life of me. And the top and bottom cookies with scrollwork are from a chair back that I saw and loved. 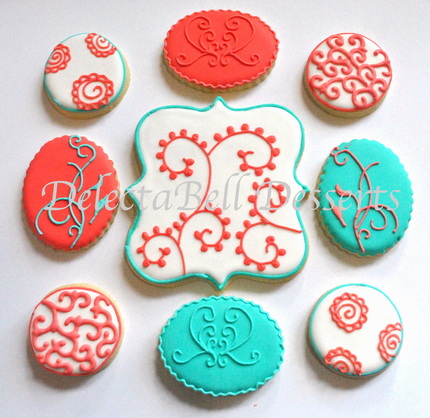 Anthropologie inspired cookies The cookies with the swirly things (really not sure what to call them) were another pattern from Anthropologie. Thanks for the great challenge this month, Georganne! Can't wait to see what you have in store for us in March!
Your turn! Where do you get your inspiration? Are you able to just sit and design something or do you like to peruse other mediums and pull from there?
As you may, or may not, know (depending on if you've seen my blurb on my homepage) I am a former scientist. My PhD is in genetics and my graduate work concerned an inherited kidney disease that occurs in both dogs and humans. My post-doctoral work focused on the genetics of susceptibility to kidney damage from high blood pressure. You might be wondering what in heaven's name this has to do with cookies, stick with me I'll get there :)
One of the most important things that a scientist does is keep a lab book. This is a book in which you write down the details of everything you do in the lab: daily tasks, experiments, results, analysis etc. Basically, your lab book should be detailed enough that any other scientist could come along and reproduce your exact experiment based solely on what you have written down. It allows both you and others to check your work and provides documentation for the date and time you performed experiments (important when you are arguing over who first made a discovery). I prided myself in well organized and highly detailed lab books, and they were worth their weight in gold more than a few times.
Still with me? Good! Now, how this relates to cookies is this: baking and cookie decorating are (to me) a LOT like running experiments in the lab. You try a recipe, see where it needs to be tweaked and try it again until you get it right. Or, you have a great cookie idea, and after you create it, you see what you could have done better/differently. That, folks, is science! And how do you keep track of all of this? A Cookie Book! We all know what a recipe book is, but a Cookie Book is a little. Let's take a look.
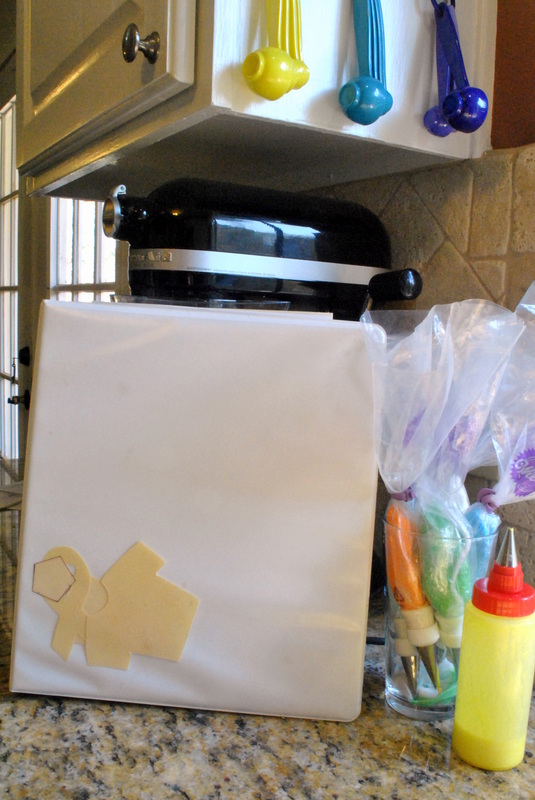
The first thing you'll notice about my Cookie Book is how amazingly fancy it is! I bought this gorgeous white binder and page protectors at HEB. Don't worry, if you don't have an HEB you just might be able to find them at any other store within 5 miles of you. Maybe. If you're lucky. Some day I plan to pretty it up a bit...you know, when the boys are grown and gone and I have a few minutes to do something like that.
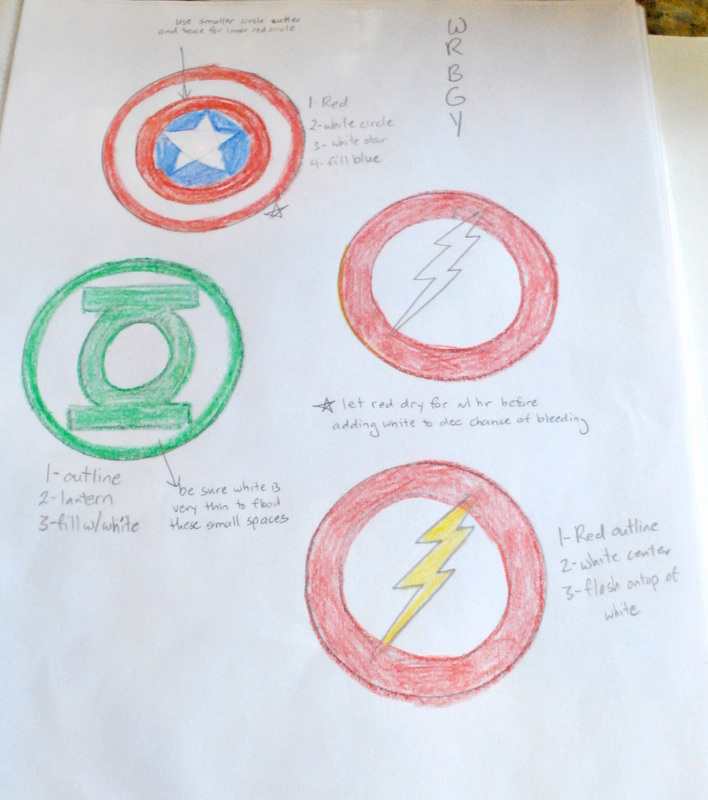
(I'm sure you're wondering about the shapes in the front cover, stay tuned and I'll cover that in my next blog post!) So, here's a breakdown of what I do when designing a new cookie. First, I get out the cutter and trace it onto a piece of paper (thank you Bridget at Bake at 350 for this idea!). Then I can color and design on paper until it is exactly what I envision. I can even shoot a quick picture of these sketches to send to my clients for their approval. I make notes about icing colors, consistencies etc for easy reference while I'm decorating. The page protectors allow me to have my sketches out on the counter while I decorate and they can be wiped clean if anything gets on them. After I'm done with the cookies, I'll go back and make any notes that might help me if I do the same design in the future. Things like: "needs thicker outline, use #3 tip", "these two icing colors should contrast more". In the picture below, you can see my color list at the top (I'm lazy and abbreviate a lot), this just helps to keep me on track and make sure I don't forget a color, especially if I only need a small amount, like the yellow or blue.
I do a lot of repeat cookies, some clients re-order a design or ask for the same cookies I did for someone else. With my Cookie Book, I can go back to the old designs and know exactly what to do to make the cookie. Some clients will also provide me with an invitation to go off of when I am designing their cookies, my Cookie Book provides handy-dandy place to keep the invitation. I keep it in the same page protector as the sketches for easy reference when mixing my colors.
My Cookie Book is still evolving to fit my needs. It's getting pretty full and I have been contemplating upgrading to a bigger binder and adding dividers so I can categorize and group my cookies. This may be an excuse on my part to go to the office supply store where I can also pick up new pens, pencils, paper clips and all sort of other neat office-y things I had not idea I needed so badly!
Now I want to open this up to y'all! I want to know, what do YOU do to keep your brilliant designs organized?! Let me know, I truly am interested in other people's methods!
When I first discovered my love of decorating cookies I was constantly scouring the internet for all the beautiful creations that are out there. Actually, I guess I still spend a significant amount of time doing that! If y'all want to see some really spectacular cookies, head on over to The Adventures of Sweet Sugar Belle, Lila Loa, SweetAmbs or Bake at 350. Those are just a few of my favorites.
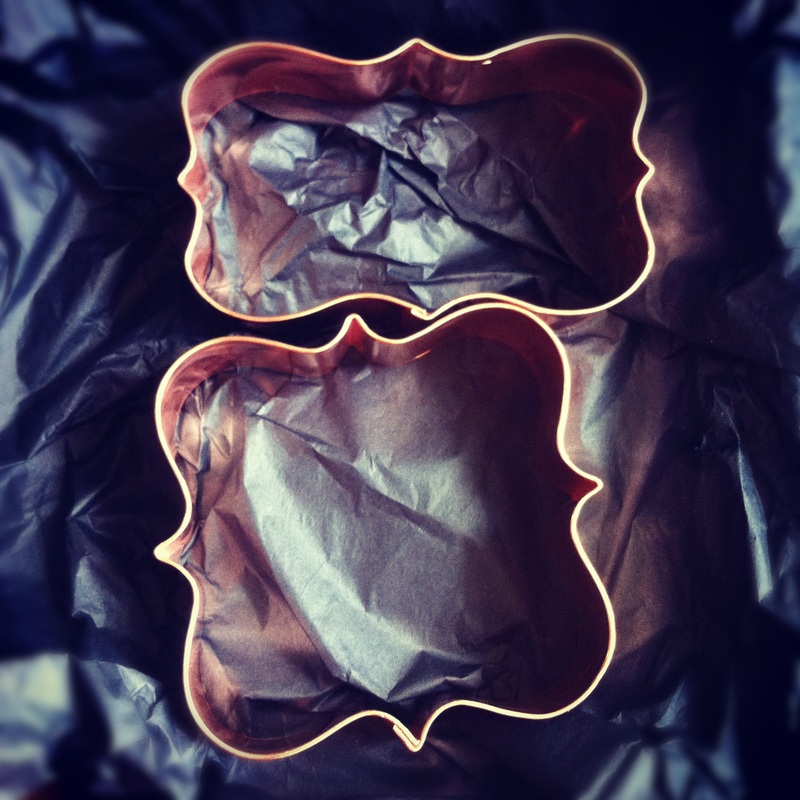
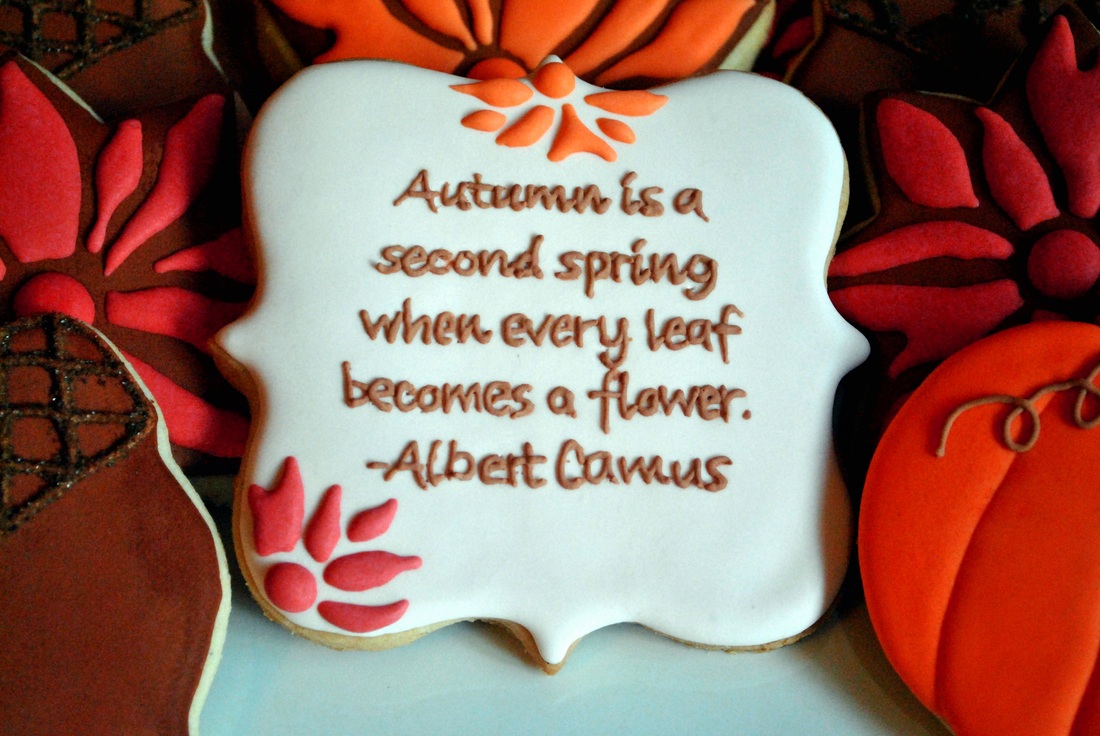
Anyway, one of things that I noticed was that there were a few cookie cutter shapes that kept popping up and made the most beautiful cookies; call them plaques, fancy square/rectangles or whatever you like, but they can really make your cookie 'pop'. They are super versatile and I could literally use them in every order that I make! The ones below were purchased from Copper Gifts, they have high quality copper cutter but that does mean they are a bit pricey. Another great option are the ones available at Karen's Cookies, they are not copper so they are a lot cheaper. Karen's is my go-to site for new cutters, tips and pretty much all cookie-ing supplies. You might be thinking "Sure, those are a pretty shape, prettier than a regular old square or rectangle, but do they really make a difference?". Let's take a look, shall we? See?! While I really liked the first cookie I did with the quote on it, I knew it was lacking. Then my beautiful copper fancy cutters arrived and I just had to have another go. The fancy square adds visual interest without distracting from all your detailed decorating. I really like them to put front and center for a cookie platter as well, it breaks up the monotony of only one or two cookie designs and allows you make the platter a little more special. And really, who doesn't like a cookie with a personalized message on it? So what do you think, would the above cookies look as good if I'd used a plain square and rectangle? I think these cutters make them look more like they are in a picture frame instead of just on a cookie. And really, with all the hard work you put into decorating cookies, you want to display them to their best advantage!Now, head on over to Copper Gifts or Karen's Cookies and order your own fancy shapes!
(I should disclose that I was not asked to promote these products or am I getting anything in return, I just truly love these cutters and wanted to share them with y'all!)
We are not what you would call 'sports fans' in the Bell House. Don't get me wrong, Hubby and I both played sports growing up and I would still love to have the time to play tennis a few days a week. Basically, we don't like to sit and watch sports, we want to be outside playing them. So, this year we (I) were excited to sign Boy #1 up for soccer! Yay, let the transformation to suburban soccer mom with a mini-van reach it's completion!
I was up bright and early this morning to down a cup of coffee and get everyone else up and ready to leave the house at 7:15am for his first game. Here's how things went:
7:40-arrive at field
7:45-get upset bc his shoes were getting wet in the grass
7:50-get upset bc he doesn't want to warm up and his ball is dirty from the grass and dew
8:00-still upset and crying, doesn't want to play in the game
8:15-decides to play, promptly gets bonked in the head, dissolves into tears
...and on, and on, and on until it was time to leave. Luckily his coach is super sweet and understanding. Poor kid, sometimes I forget that it must be hard to be 3.
Anyway, all this got me thinking about sports, then cookies and how nice it is that a lot of sports use balls, which are usually (looking at you rugby and football!) round, and easy to make into cookies. My mind always comes back to cookies, y'all.
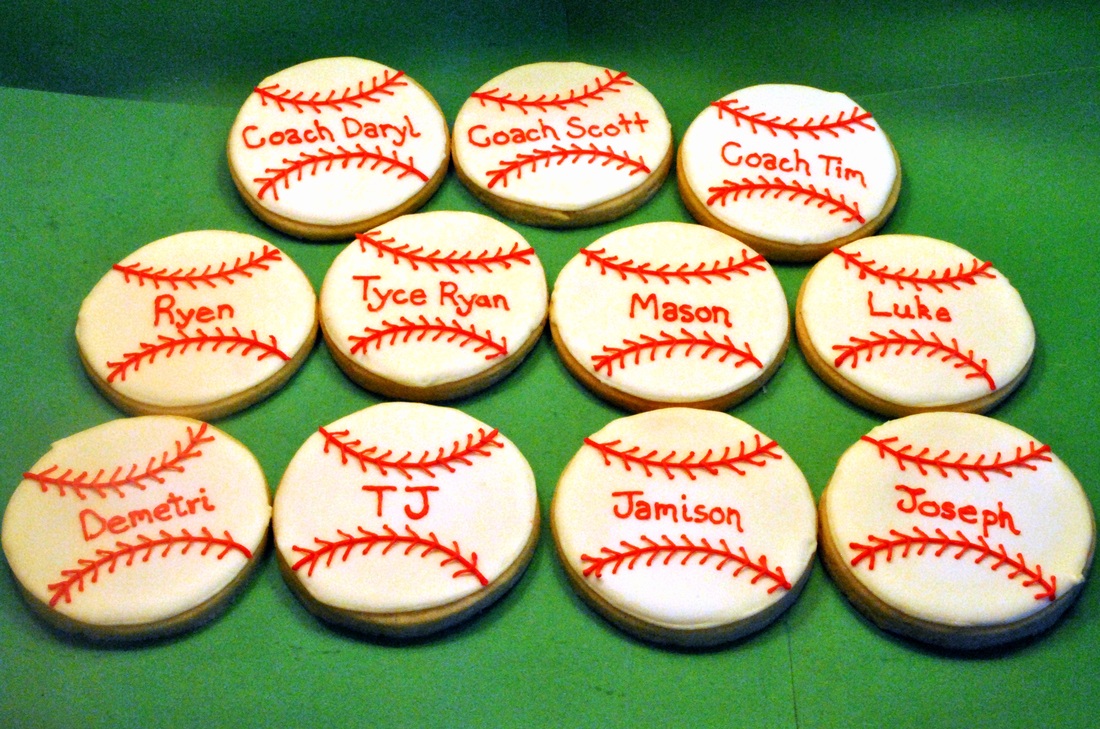
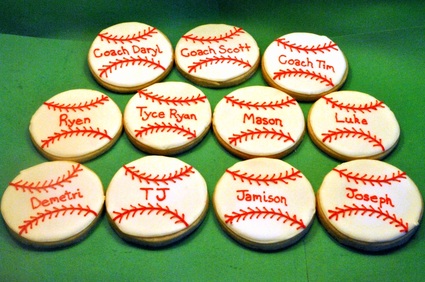 Baseballs These are great for team parties. Especially if each player and coach gets one with his or her name on a cookies. These were for an end of season party for a friend's son's team.
 Soccer ball These soccer balls were actually for a friend that loves soccer and had recently had a baby. But, again, would be fun for an end of the season party.
 Volleyballs with mascot Or, if you have an actual team or school mascot (instead of a random name chosen by a group of 3 year olds), it can be incorporated in the cookie design as well.
If you have a kid in sports keep me in mind for the end of season party! And in the mean time, say a little prayer than next week's soccer game has a few less tears and a little more fun.
As many of you know, I live in a house of boys. Other than our insane cat, Maggie (and she's so crazy I'm not sure she counts for much), I am the only girl. Hubby, Boy #1, Boy #2, dog and (slightly less crazy) cat keep my life interesting. Boy #1 is 3 1/2 and Boy #2 is 20 months and they LOVE dinosaurs. They (and consequently, I) spend a lot of time roaring and stomping, playing with dinosaur toys and watching Dinosaur Train. That show is pure genius, dinosaurs AND trains, what boy wouldn't love it?! So, when a sweet friend with boys of her own asked me to make dinosaur cookies I was super excited! And, did I mention, she placed two orders for them? Yes, she totally rocks.
 Dinosaurs round 1 Here is the first set I made (see above). I did some browsing around and like the dinosaurs Sugarbelle made, the black outline kind of made them pop. I had my paleontological fact checker (Boy #1) assure me that these were accurate representations of a T. rex and Triceratops, then he promptly bit the head off an extra triceratops and declared he was a very hungry T. rex. 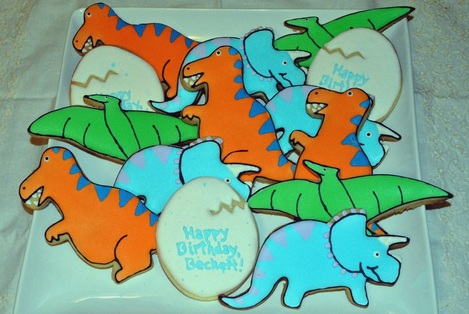 Dinosaurs, round 2 In the meantime my work-wife (from my time in research) and a fellow Dr. Bell was planning a Dinosaur Train themed birthday party for her soon to be 3 year old. Now, character cookies are tricky and we were going to do trains from the show but after the first round of dino cookies we decided to make the dinosaurs in the same colors as those on the show. I even threw in some hatching eggs. As these were my birthday present to her son, I carefully packaged them and entrusted them to the ever vigilant and cautious care of USPS. BAD MOVE. Each and every cookies broke :( I'm pretty sure they think "fragile" means "put this box under the biggest, heaviest one on your truck and then drive over speed bumps at 50mph. Sigh...
 Dinosaurs round 3 Then it was time for the second set of dino cookies for friend who first ordered them. These were fun because I was able to take the design and colors I liked best and combine them.
Of course, with each order I had to make a few extra for my own little dinosaurs to munch on. These are really fun to make and I can't wait for my next dino order!
It's officially fall in Texas!! Ok, that might be a bit of an exaggeration...but we are supposed to reach a low of 65 tonight, that counts for something, right?
In case you can't tell, I am really looking forward to the weather cooling down here. Summer are fun in some ways but I get tired of the blazing heat pretty quickly. So, in order to help usher in fall I decided to get cracking on a new line of fall cookies.
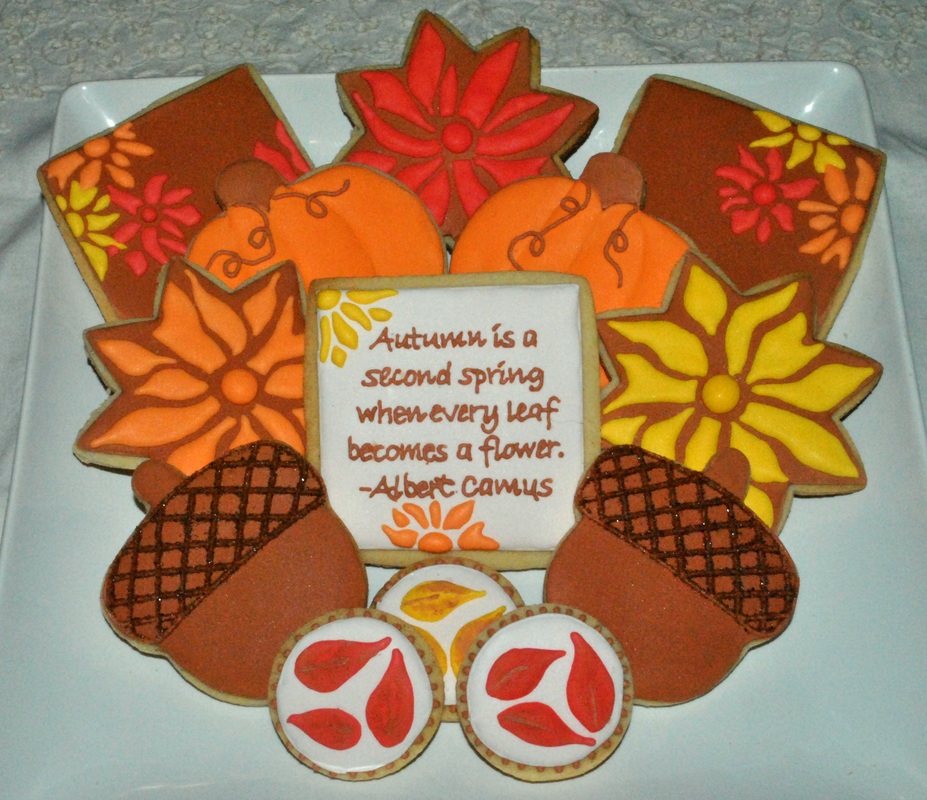 Fall sugar cookies These designs were inspired by some cards at Tiny Prints, their designs are just wonderful, you should check them out! I love the acorns, they are simple but the sanding sugar adds a little sparkle to them. The centerpiece cookie is, well, the centerpiece of this group. Writing on cookies is not nearly as easy as it might seem, getting the right script can be a challenge. But the work pays off in the end. 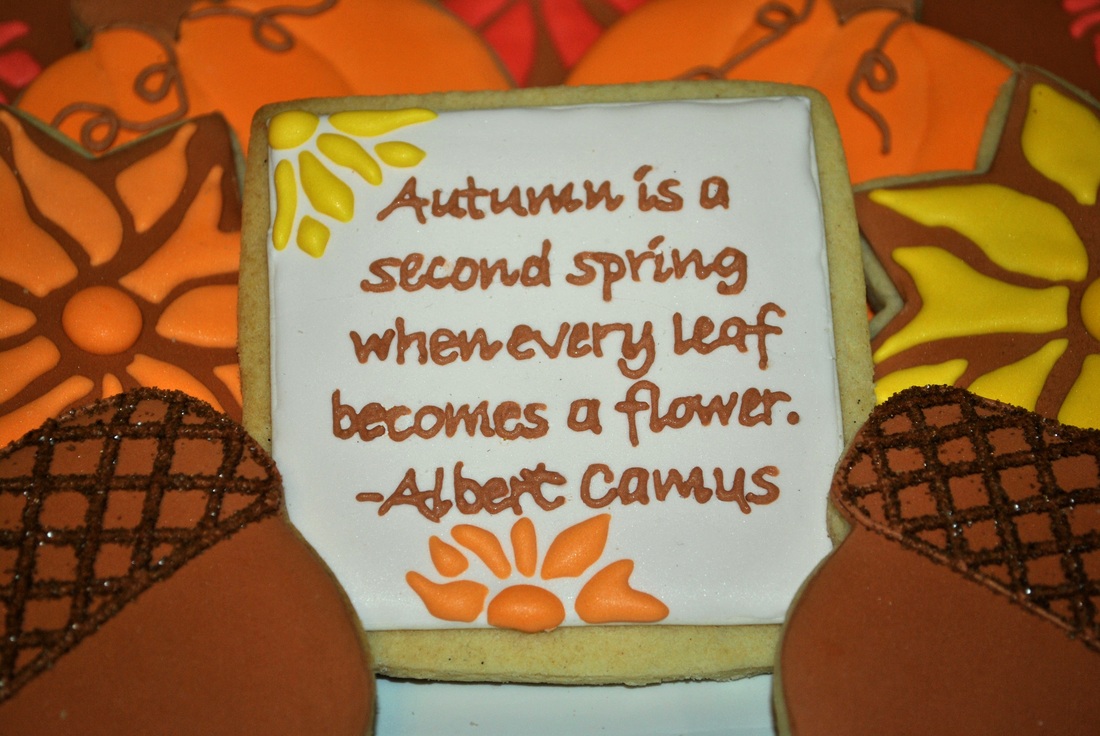 Centerpiece cookie with quote I hope everyone gets to enjoy some cool fall weather soon!
|


 RSS Feed